Viewing pictures
The desktop app is not released yet.
The viewer shows one picture at a time, with the other pictures of its folder in a strip at the bottom (the filmstrip). Its top bar is laid out like the web app's photo viewer: Library and Open on the left, the file name, date taken and position in the middle, and the actions on the right.
Opening pictures
- Double-click a picture in Explorer once the app is your default viewer, or open it with Open with > LibrePhotos Viewer. A second double-click while the app runs goes to the same window.
- Open (
Ctrl+O) in the top bar picks a file. - Drop a file onto the window.
- Click a picture in the library.
The viewer opens what the app can show: JPEG, PNG, GIF, WebP, BMP, TIFF, HEIC and HEIF, AVIF, JPEG XL, camera RAW files (Canon, Nikon, Sony, Fujifilm, Olympus, Panasonic, Pentax, Samsung, DNG and more) and videos (MP4, MOV, WebM, MKV, AVI). Very large pictures (more than 24 megapixels) are drawn in tiles when you zoom in, so zooming stays smooth.
Moving around
| Key | Does |
|---|---|
← → (or Page Up Page Down) | Previous and next picture |
Home End | First and last picture of the folder |
+ -, the mouse wheel | Zoom in and out |
0 | Fit to the window |
1 | 100 % (one picture pixel per screen pixel); click the zoom percentage to switch between fit and 100 % |
F11 | Full screen |
Space or F5 | Slideshow (any key ends it) |
Esc | Leave full screen, or fit the picture again |
L | Back to the library |
Actions
| Key | Does |
|---|---|
F | Add to or remove from favourites (the star in the top bar) |
Ctrl+1 to Ctrl+5 | Rate the picture 1 to 5 stars; the same key again, or Ctrl+0, clears the rating |
R, Shift+R | Rotate right or left. JPEG and TIFF files are turned by changing their orientation tag (no re-compression), PNG and BMP files are saved again without loss; other formats turn on screen only |
Ctrl+C | Copy the picture to the clipboard |
Del | Move the file to the Recycle Bin (asks first; Shift+Del does not ask) |
I | Show or hide the info panel |
The ⋮ menu holds the rest: Show in folder, Add this folder to library, Upload to LibrePhotos (while a server is connected), Set as default photo viewer and Clear thumbnail cache.
Favourites, ratings, captions, keywords and dates are explained in Editing a picture's details.
The info panel
I (or Info in the top bar) opens the panel on the right. From top to bottom, in the web app's order:
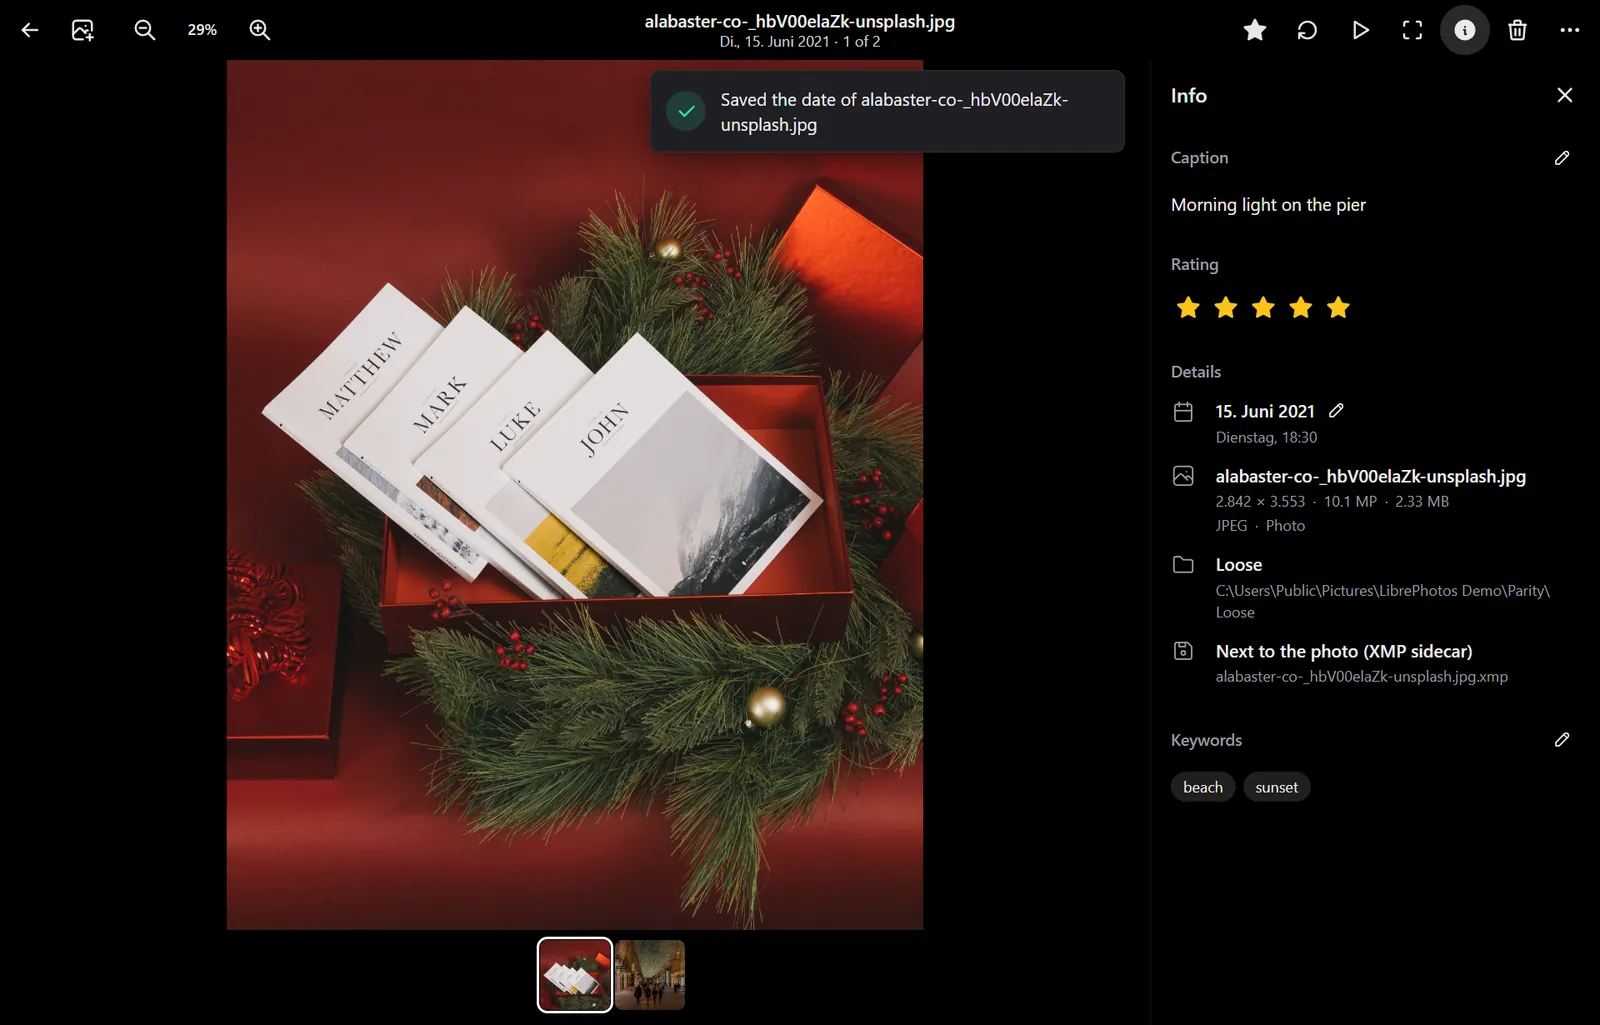
- Caption: what you wrote about the picture, with the pencil to change it.
- People: who is in the picture, when it is on your LibrePhotos server and you are connected.
- Rating: five stars.
- Details: the date taken (with the pencil to change it), the file (size, pixels, format), the camera, lens and exposure, the location, the folder, and where your edits are saved.
- Keywords, with the pencil to change them.
- Albums: the server albums the picture is in, and Add to album, when it is on your server and you are connected.
- Metadata: other values from the file, such as the white balance and the software that wrote it.
- LibrePhotos: whether the server has the picture, and the things it found in it. A picture that is not on the server yet has an Upload to LibrePhotos button.
Without a server the People, Albums and LibrePhotos parts are not shown; everything else works the same.
Location
A picture with a position shows its coordinates, a button to copy them, and Open in map, which opens the place on openstreetmap.org in your browser. The panel shows a small map as well when you turn on Show a map from OpenStreetMap in Settings. It is off at first, because the map pictures come from the internet and tell the map server roughly where your picture was taken. On a picture that is on your server, the place name the server found is shown above the coordinates.